Philosophy
A digital library is an excellent way to organize sources and files. The goal of reference management is to have a central place for keeping a detailed record of sources used not just for a single project, but all sources you've ever encountered or might need to use again in the future. A reference manager filled with several thousand sources is a very powerful research tool.
I have used several reference managers, including Mendeley, Endnote, and of course Zotero. I went through the painful task of migrating my database from one manager to the next, until finally discovering Zotero offers all the functionality I need. Everyone's needs will be different, so if there is a specific function that Zotero just can't fulfill for you, then by all means look for other options. It is my opinion that Zotero currently offers the best long-term solution for organizing and storing a large number of sources and files. As a bonus, it is free and open-source software.
I have used several reference managers, including Mendeley, Endnote, and of course Zotero. I went through the painful task of migrating my database from one manager to the next, until finally discovering Zotero offers all the functionality I need. Everyone's needs will be different, so if there is a specific function that Zotero just can't fulfill for you, then by all means look for other options. It is my opinion that Zotero currently offers the best long-term solution for organizing and storing a large number of sources and files. As a bonus, it is free and open-source software.
Getting Started
Head over to zotero.org and download the version of the software you need. If you are running windows, I highly recommend using the standalone version. The steps in this guide should be applicable to other versions, including for Mac, although I have not extensively tested anything other than the standalone version and the Chrome plugin on Windows.
If you want to proceed with the setup, please ensure that you read this guide until the end. Some issues may seem minor, but can turn into big headaches later on if best practices are not followed. I address each of these issues. Once installed, you first need to configure your setup. Of course, Zotero offers the option to create an account and use their online sync feature. Unfortunately, I have not had much luck with using online sync features in any reference manager. If you change computers, or if your computer suddenly crashes, be prepared for the sync to get your database back up, but don't expect it to be perfect. Another problem with relying on online sync is the limited free space offered for online storage. If you have a lot of journal articles, you're going to need to start paying for more storage pretty quick. Another issue of concern with using an online account is safe keeping of your database (you're going to put a lot of work into this and it is important to keep multiple backups) and your files. This guide will show you how to setup Zotero to work in a totally offline environment, and how to conveniently backup everything to the cloud and to physical backup drives.
If you want to proceed with the setup, please ensure that you read this guide until the end. Some issues may seem minor, but can turn into big headaches later on if best practices are not followed. I address each of these issues. Once installed, you first need to configure your setup. Of course, Zotero offers the option to create an account and use their online sync feature. Unfortunately, I have not had much luck with using online sync features in any reference manager. If you change computers, or if your computer suddenly crashes, be prepared for the sync to get your database back up, but don't expect it to be perfect. Another problem with relying on online sync is the limited free space offered for online storage. If you have a lot of journal articles, you're going to need to start paying for more storage pretty quick. Another issue of concern with using an online account is safe keeping of your database (you're going to put a lot of work into this and it is important to keep multiple backups) and your files. This guide will show you how to setup Zotero to work in a totally offline environment, and how to conveniently backup everything to the cloud and to physical backup drives.
Setup
Step 1: Tell Zotero where to store your database file.
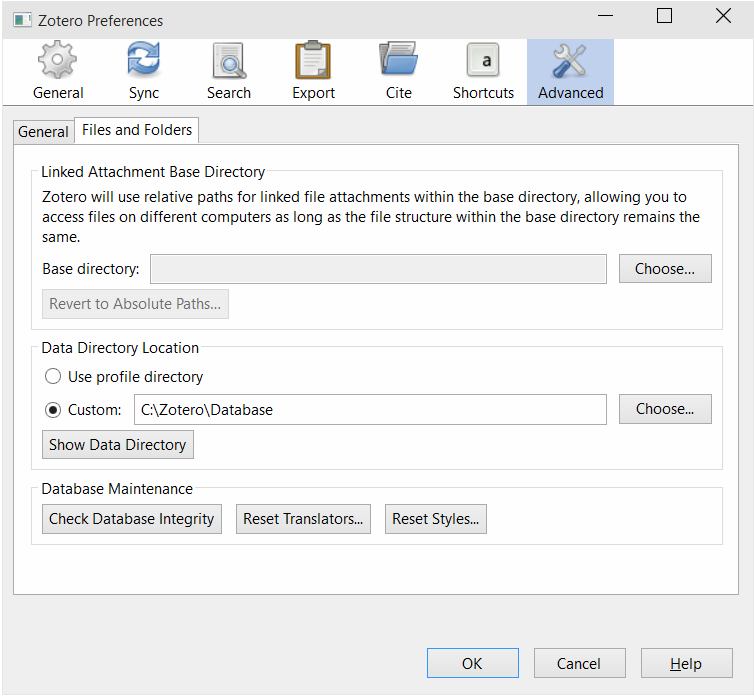
Open the Zotero Preferences and under the Advanced tab, click files and folders, then set the Data Directory Location to Custom, and point it to the location where you want your database file (zotero.sqlite) to be located. A good place to keep it may be: C:\Zotero\Database or an equivalent path on your system. Zotero will recognize that the folder is empty, create the file, and prompt you to restart Zotero. If you're new to Zotero, skip the following paragraph.
If you have already been using Zotero: Move the database file from its present location to a new, permanent location. Zotero creates a file called zotero.sqlite, this is your database file. By default, Zotero places this file in a temporary folder. Check the following link to find the location of the file, which is different depending on your operating system: zotero.org/support/zotero_data. Next, create a folder which you will move this file to with the intention of letting it remain there permanently. You only need to move one file: zotero.sqlite. Zotero will re-generate all of the other files and folders in this directory automatically. Any time you move to a new computer, as long as you you place zotero.sqlite in the same path, and tell Zotero to look for it there, you will have easy access to your database. No more relying on online sync. You're now in control.
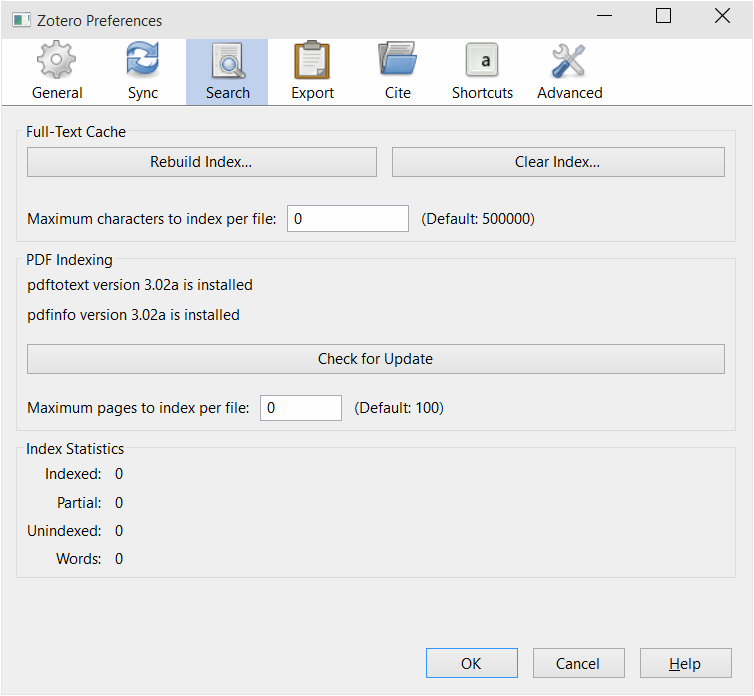
Next, you may want to turn off indexing in Zotero. I do not index my files for one simple reason: With literally thousands of files indexed, the zotero.sqlite file becomes too large to manage. I'm not an expert in this area, but I have read that larger .sqlite files are more susceptible to corruption. Unindexed, a Zotero database with 1,000 items will be approximately 5MB. Indexing is a very powerful feature, as it allows you to search inside the text of PDFs, but I have found that I do not miss this feature very much. Go to the Zotero Preferences and set the maximum characters and maximum pages to index both to zero, as shown below. Even if you choose not to use indexing, you need to install pdftotext and pdfinfo so that PDF metadata can be retrieved from Google Scholar (more on this later).
Step 3: Install ZotFile.
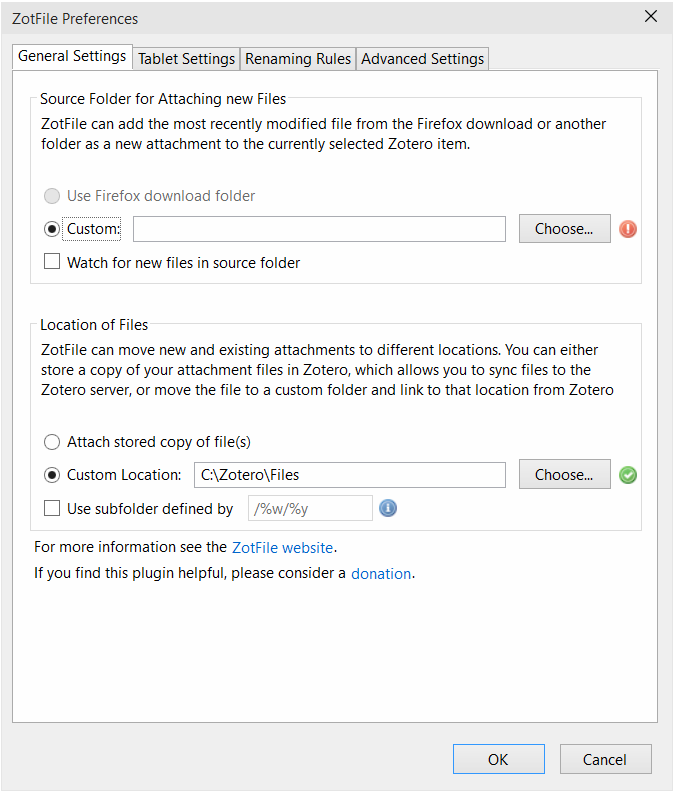
ZotFile is a Zotero add-on that you will use to keep your PDFs and other files in one location, all using the same naming scheme. After you've installed ZotFile, open the ZotFile Preferences, and under the general settings, set the Location of Files to Custom Location and tell Zotfile where you want to store all your files. Again, you're going to want to choose a permanent directory for your files. Note: This can be changed later, but is a bit of a chore (especially if you have a lot of files) and requires an additional plugin called Zutilo. I recommend storing your files in: C:\Zotero\Files or an equivalent path on your system. Uncheck the box to watch for new files in source folder. It's simplest to add files to Zotero manually, as I explain later.
ZotFile is a Zotero add-on that you will use to keep your PDFs and other files in one location, all using the same naming scheme. After you've installed ZotFile, open the ZotFile Preferences, and under the general settings, set the Location of Files to Custom Location and tell Zotfile where you want to store all your files. Again, you're going to want to choose a permanent directory for your files. Note: This can be changed later, but is a bit of a chore (especially if you have a lot of files) and requires an additional plugin called Zutilo. I recommend storing your files in: C:\Zotero\Files or an equivalent path on your system. Uncheck the box to watch for new files in source folder. It's simplest to add files to Zotero manually, as I explain later.
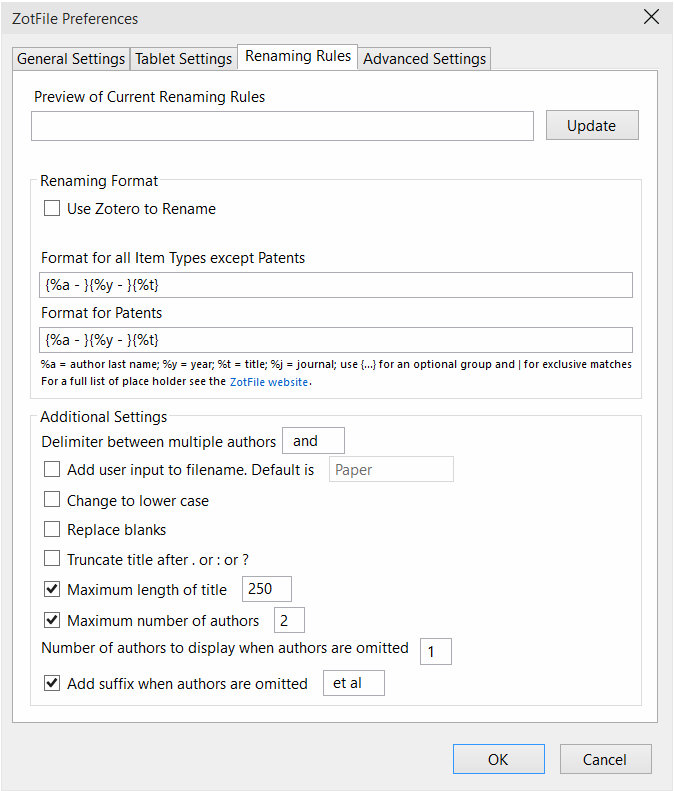
Next, go to the Renaming Rules tab, and tell ZotFile how you want your files to be named. First, uncheck "Use Zotero to Rename" and then set your formatting parameters. If you want to use "Author - Year - Title" then you would type the format as shown below in the picture. Note that you can also make sure full titles are included in the filenames by increasing the maximum length of the title. Note that certain operating systems limit this length to about 250 characters or so. Uncheck the "Truncate title" box.
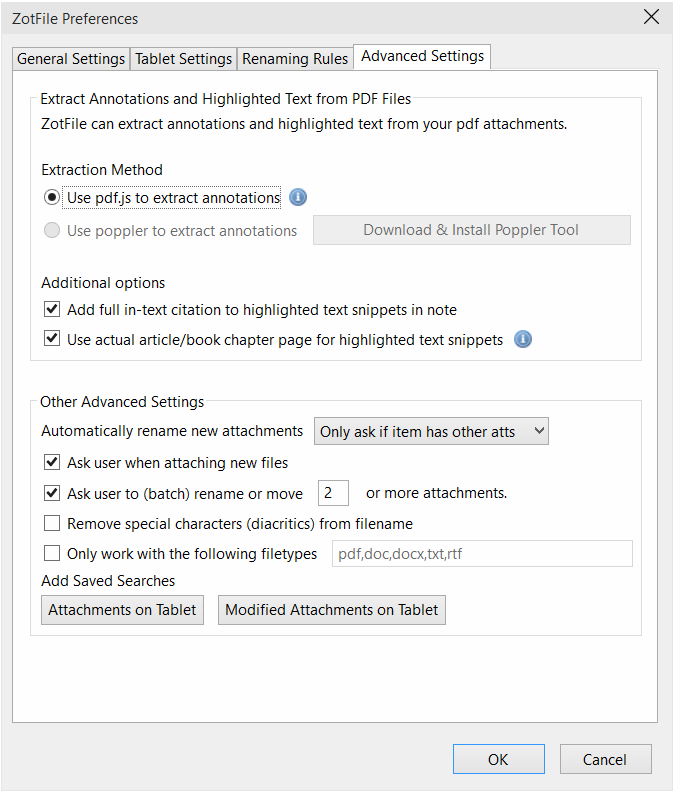
One more step to set up ZotFile and you're done. Go to the Advanced Settings tab, and uncheck the "Only work with the following filetypes" box.
Step 4: Start adding files.
You're ready to start building your database. Just pay attention to these last few steps to ensure that as you're adding sources and growing your database, your files stay neatly organized in the location you set up earlier.
Create a folder in Zotero called "Unchecked" or something similar. This is where you will add all new files. Do not add new files to the main library or in any other folders. You will quickly lose track of them. Any new file you add should immediately be checked for accuracy, renamed, sorted into an appropriate folder for long-term storage, and removed from the "Unchecked" folder. I recommend adding a new file simply by dragging the PDF (or other type of file) into the Unchecked Folder. Next, if the file is a PDF you will right click on the file and hit "Retrieve Metadata for PDF." This will check Google Scholar to see if the metadata can be added automatically. If this function finds your metadata, it will be correct 95% of the time. If your file is not a PDF, right click on the file, select "create parent item" and edit the metadata manually. After checking the metadata for accuracy, right click on the file (or select several) and under Manage Attachments, hit "Rename Attachment." This will tell ZotFile to rename and move the files to the designated location on your hard disk (C:\Zotero\Files). Note: When downloading a file from the internet, do not save it directly in your Zotero "Files" folder. You will never manually add files to this directory. ZotFile will add them for you. After this is done, you can delete the files from your download folder.
You should now have a single file in C:\Zotero\Files (or equivalent) and it should be named according to your naming rules. To check that it worked properly, right click on the item in Zotero, and hit "Show File." Your file location will open. It should be located in your designated location.
If you want to be particularly well-organized, you will want to make sure that every entry in your Zotero database corresponds to exactly one file in your file directory. In cases where you do not have a file to go along with the entry (as in the case of books), I recommend using a blank text file as a placeholder file. To add an entry for an item without an associated file, simple create a blank text file, drag it into your "Unchecked" folder, create a parent item, add the metadata, and rename as usual. You will now have an empty text file with a filename matching the metadata you entered in your Zotero Files directory (C:\Zotero\Files). Perhaps this step is a bit too much for some, but I find that it helps me know that there aren't other Zotero entries for which I do have files, that I forgot to rename and move with ZotFile. Checking your database for accuracy is now simply a matter of looking at the total number of items, which can be done by clicking the "My Library" button to see the total number of items in your database, and comparing this number with the number of files are in your Files directory. These numbers should always match exactly. This method is also very useful for adding items in Zotero that reference book chapters in edited volumes, which you will likely be citing often. Even if you have the book file, you will still need to have individual items for each chapter you want to cite. (Just be sure to set the Item Type to "Book Section" in this case.) One more tip: Use the "Tags" tab in Zotero to add additional metadata that will make it easier to find items based on keywords you associate with that particular source.
Removing items: ZotFile is great at moving files into your storage folder, but it does not know when an item has been removed from the Zotero library and delete the corresponding file in your Files directory. If you want to remove an item, and it has an attached file in your storage folder (which it should!), then you want to first right click the item, hit Show File, and then manually delete the file. Then you can remove the item from your Zotero library.
A final note: The path where Zotero will look for your attached files is saved by ZotFile as a bit of metadata in each individual Zotero item. Unfortunately, you cannot edit this directly using Zotero. There is an extension called Zutilo, which I mentioned above, that can do this. If, for example, you want to switching from Mac to PC or vice versa, you will need to use Zutilo to change the path of every single item in your library. This isn't as painful as it sounds, as it can be done in bulk, but it will take a little while if you have many files. You will simply use Zutilo to "Modify Attachment Paths." Zutilo is also great for generating bibliographies from a folder full of sources. Just hit "QuickCopy Items to Clipboard" and paste them where you need to.
Using Zotero in Word
You're now ready to start using Zotero to create citations and bibliographies in your own projects. The first step here is to install the Word plugin. This is done through the Zotero Preferences in the Cite tab. Once the plugin has been installed, there are a few optional steps which make using Zotero a breeze.
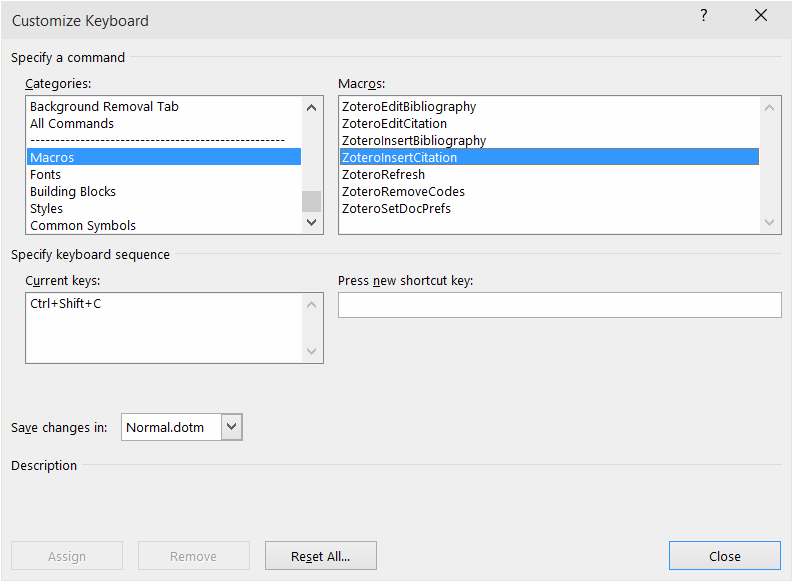
Setting up Zotero keyboard shortcuts in Word: Open Word Options and go to Customize Ribbon. Now click "Keyboard Shortcuts." Scroll down to "Macros" and you will see the Zotero functions. You can now add your own custom shortcuts. I only use a shortcuts for inserting, editing, and refreshing, but you can add more as you please.
Setting up Zotero keyboard shortcuts in Word: Open Word Options and go to Customize Ribbon. Now click "Keyboard Shortcuts." Scroll down to "Macros" and you will see the Zotero functions. You can now add your own custom shortcuts. I only use a shortcuts for inserting, editing, and refreshing, but you can add more as you please.
Collaboration with Zotero
You've now mastered using Zotero on your own, but you have a project to work on with one or more collaborators. No problem. Zotero will be useful for all of you. Luckily, if you're running Zotero standalone, you are able to download a browser plugin version of your choice and run that simultaneously. Remember, we do not login to Zotero standalone since our database and files are all kept locally. If you have a folder of items in your local database that you want to move online to share with collaborators, use the Export Collection function in Zotero. You may not be able to upload the attached files, depending on how much space they take. You will need a Zotero account to use shared folders.
Backup and Recovery
The final step I want to cover is how you might go about backing up your database and files. I use a program called FreeFileSync for my backups. (Note: FreeFileSync is not Free Open-Source Software like Zotero, which I would prefer to use if I knew of a suitable alternative. If you know of an open source alternative that offers the same functionality, please let me know. Important: When installing FreeFileSync, it asks you to install a piece of additional software. Uncheck the box to avoid this.) Backing up is as easy as setting up a sync job in FreeFileSync by telling it which folders you want to sync. For example, you can create a job called "Zotero to Cloud" which will send C:\Zotero to a location on a USB stick, or in your Google Drive, OneDrive, Dropbox, etc. Now you may be wondering why I haven't recommended you simply store your database and files directly in a cloud service. The primary reason for this is to protect against data corruption. There are numerous posts on the Zotero message boards advising against running the .sqlite database file out of the cloud. To ensure database integrity, close Zotero before performing your backup.
When switching to a new computer, getting Zotero set up again is as simple as restoring your backup to C:\Zotero, reinstalling Zotero, and telling the program to look for your data file in that location. The advantage of using a sync program for backing up is that you do not have to overwrite entire folders each time you sync. The software tracks changes that have been made to any files (for example your zotero.sqlite will change any time you edit any metadata or add or remove any items) and it only syncs those files that have been altered, added or deleted.
Please contact me if you have questions, comments or suggestions about this guide. I hope it was helpful for you.
